Monday, November 12, 2012

Fall fun

Yard Work

By the time word of Hurricane Sandy got serious, we already had many leaves on the lawn.  Wet leaves are a pain to handle so we wanted to make a dent in the fall lawn management.  We were afraid to pile them in the street because we didn't want them washing into and clogging the storm drains.  The last option, which was luckily the laziest, was to just run everything over with the lawn mower at the lowest setting for the last cut before winter.

Matt was breaking down and bundling up some branches while I got started on the mowing. All of a sudden I hear a loud bang and the lack of "lawn mower" noise.  We have some exposed roots in our yards that I am terrified of running over, so I give them a wide berth.  There was one gnarly bugger who was hidden under a few leaves.  It stopped the engine in its tracks.

I ran out to a local garden store (Home Depot didn't carry the blade we needed, but laughed politely when I held up the damaged blade) and we replaced it that afternoon. Thankfully we didn't bend the center shaft.

Molly, trying to get primal
Earlier in the week we were moving some piles of brush we had stacked up. Our garbage company takes bundles of sticks four at a time for free, so we've been buffering them. I decided a pile of sticks would be a very happy home for some local wildlife and that we should break it up into smaller piles. So while we were doing this, and out from one of the last piles ran a small vole. The next 30 minutes were spent watching Molly tear around our yard chasing it.  The vole ran outside the perimeter of the fence multiple times, just to run back into the range of Molly...voles must not be known for intelligence.

It finally got stuck in a window well, and we were able to shoo it into a bucket. I then drove it over to the nearest field and let it loose....while some people watched me awkwardly from their back porch.

We have half an acre of property and a good chunk of that is fenced (around the pool) so dealing with leaves has been a pain. We decided to tap out and get an industrial backpack style gas powered leaf blower. (Husqvarna 150BT)

Not only is it fun, but it works great :) we made quick work of the backyard today.


Hurricane Sandy

We don't have a battery backup for our sump pump so we decided to make one... sort of. We went out to Pep-Boys and bought a car battery (the same style that goes in both of our cars just in case one dies we can use this - multipurpose!) and Matt connected it to a 750 watt inverter he bought for his "silly project car" he worked on a while ago. We periodically checked the pit once we lost power just in case, but it remained dry throughout the storm luckily despite the yard around the house pooling with water.


Our other hurricane prep included moving everything off of the floor in the garage, the down spout extenders were all attached, and we had enough halloween candy.  We only lost power for two days and were able to keep our fridge and freezer at temperature.


Wendy's for dinner by candle light
First Spare Bedroom

We finally finished the first bedroom. We put the final coats on the doors, and replaced the window locks. One lock had come off and removed a large enough chunk of wood to make it not possible to replace easily, so we just put the lock on the right side of the window. Function over fashion. We plan on replacing all the windows in the house at some point, so this is really just lipstick on a pig anyway.

Sunday, November 4, 2012

GLaDOS Pumpkin tutorial

How are you doing, because I'm a pumpkin

In addition to the light show we wanted to carve some pumpkins. While looking for ideas (and seeing other peoples pumpkin's Dustin gave me a great idea of making a pumpkin sculpture of GLaDOS (an AI robot from the awesome game Portal... even if you don't like most video games, I can all but guarantee you will love this game do yourself a favor and play it)

Like with most of my crazy ideas, Halley was skeptical at first, but was soon on board. We used three pumpkins of small, medium and large size (we had to redo one of these as it rotted before we could use it).

I started with a 3d model I found online  We used this for our inspiration.


Starting materials after a rough initial shaping

There are three main shapes to her: her head, bottom and back, each larger than the last. All of these shapes are spherical, so look for relatively round pumpkins. We carved these large shapes first, then used what we had left for "cables" and other details. (the cables are just thinly cut strips of pumpkin)

Prepping for the overnight
bleach solution soak

We wanted to make sure this would last so we read a few articles (here's a comparison) on how to preserve carved pumpkins the longest, and most people agreed to use a mixture of bleach and water.


Once we  had the shapes cut out, we started on the detail work for the large pieces. We used the 3d model again for inspiration. Doing her face out of a single piece exactly didn't seem very doable, so we decided to represent negative space by removing the pumpkin skin. The only place we actually cut all the way through was the eye (We wanted to put an led from my light show here, and didn't want to be bother by carving it super thin)

The other large pieces were ellipses with "wings" so we drew the basic shape onto the pumpkin, carved it, then skimmed off a thin layer on the "wings" to differentiate them from the main piece.

For the sides of her head, we used her finished head as a template to draw the needed shape onto the side of a pumpkin scrap. The design was Halley's interpretation based on the 3d model above.


Drying pumpkins
After carving the detailed pieces we laid them all out to dry.
GLaDOS hangs from the ceiling, so we wanted to do the same. I used some left over electrical conduit I grabbed from work (we had some electrical work done recently, and the electricians threw out a couple of longer bent up pieces.) We put the conduit in between two cinder blocks and shaped it with a sledge hammer carefully.

Once we had it in a nice "J" shape, we put the largest of the three pieces on her. We just shoved it through the pipe and friction held it in place.
Tiny holes and twine to secure the middle
body section

The second piece was a bit too small to do this, so we put 4 small holes through it, and tied it on with twine 

The face we wanted to sit on the end, so we used a dowel shoved into the back of her head (close to the pumpkins stem so it would be sturdy) and put the dowel into the conduit.

After the main pieces were on, we just took a bit of "creative license" and added "wires" wherever we felt, and adhered them with small nails.


The Final Product


Tuesday, October 9, 2012

Outdoor fun and finishing another room

Gutter Guards

When we saw a tree growing from our gutters we knew it was time to do something about them. We only wanted a band-aid as we plan on replacing them entirely when we get a new roof, so we decided to get the cheap roll of plastic mesh you jam in the gutters.

Halley worked on the shorter roof (above the garage) while I went up on the main roof. After cleaning out all the gross junk in the gutters, we started cramming the gutter guards in. They fit in with pressure/friction and bow out a tiny bit because of that (by design).

How well will they work? Who knows!  We'll find out soon enough.


Pseudo Landscaping

Before
After ripping out all of the bushes on the side of the house, we decided to move the line of bricks that surrounded the "flower bed" that was already in front of the house. We had already planted some bulbs, various ground cover perennials.


After
We bought about 60 new bricks and wove them in with the existing bricks to lay out a new outline that looked a little nicer to us. Given that we are not professionals there is a bit of "wiggle" to our "straight" lines... I'll chalk that up to "charm". 


Before

After

Bedroom Repaint
We decided it was time to start in on a relatively low cost project and tackle the first spare bedroom.  Eventually a tiny human will live there, but for now it will serve as a guest room.  At some point in the future we'll get the hardwood floors in the house refinished, but that is a project for another time...perhaps decade.  We were clever enough to set up a time lapse for the work on most of the room (except painting the baseboard and trim).  


We followed our now standard procedure for the bedrooms:
  • Use oil based primer to prevent the wallpaper from bubbling up and falling off the walls (learned that trick from the debacle here)
  • Put up crown molding and caulk our mistakes
  • Paint ceiling and crown molding
  • Paint walls
  • Rip up carpet and remove tack strips and staples
  • Paint baseboard and trim
  • Call it a day, eat cheetos


Nearly "after", still need to paint baseboard, trim and doors.


Sunday, September 9, 2012

I'm a lumberjack and I'm OK

Spider mites, a formidable foe and other back yard fun
Despite our efforts to use predator insects to nibble on the spider mites, two of the three infected trees have started to die.  We removed the tree's that were already on their way to the lumber yard in the sky and also took down three Mulberry trees.  Mulberry trees become a problem in the fall once they start to drop their berries, they make a huge mess and are all pretty much 'volunteer' trees spread by birds.  We took a video of the process of dropping one limb off of the largest Mulberry.

Some before and after shots of the yard in general.  The before shots were taken when we were scoping the house out before buying it so there is no foliage on the deciduous trees.  The after shots were taken more recently after a whole summer worth of growing so some of the yard has really do
Before
After

Before, please ignore the green pool
After


Before
After


Before
After

Garage improvements
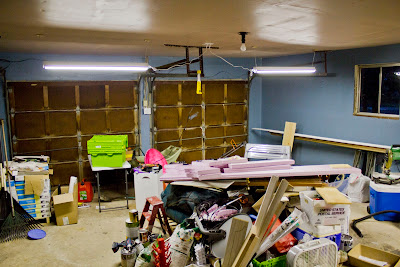
The walls of our garage are the brown paper backing of sheet rock with joint compound over seams and nails, not terribly pretty but far from "scenic."  My mom taught me a great trick of buying the dud paints that customers have returned to Home Depot because they got the wrong color.  You get high quality paint for $7/gallon instead of +$25/gallon.  We chose a mix of light colors for the ceiling and some dark blues (to mix with the remainder of the ceiling blend) for the walls.  I was talking to my mom about how smart I felt when we snagged the paint, her response was something like "you think that buying boo-boo paint makes you feel smarter than getting a PhD from Princeton?"  Yes mom, sometimes it does.

Mostly before, some of the ceiling paint is up (please notice
the single bare bulb meant to light the entire garage)
The dumb socket in the center of the garage is controlled by a light switch, so Matt was able to use his wiring prowess to install light-switch-controlled-outlets in the ceiling.  Why bother with an outlet on the ceiling?  So we can hang some monster fluorescent fixtures and be able to see what we're doing in the garage after the sun sets.  We hung an additional fixture over the work bench so detail work could be well lit too.

I don't know what this means

Ceiling outlet, for the win


Here is the finished product, far better than what it started as.  I do not care that the ceiling is glossy and faintly pink


Someday, the garage doors will be upgraded and perhaps even run with
an electric opener instead of our legs and back.

I'm sure you have a pile of stuff in your garage too so I don't feel any shame
about sharing this disaster zone.

The old "I'll just re-mortar this one tile back into place" trick
When we first viewed the house we noticed a few tiles in the upstairs hall bathroom had taken up a nomadic lifestyle rather than sedentary.  I finally got around to re-mortaring them.  Matt was fiddling around in the office while I started in on the project:

OK, I'll just pull out the obviously loose ones.  Oh sheesh these adjacent ones are just being held in by friction and aren't even stuck to the mortar anymore.  Neither are these.  Better just take them up to be sure.  Oh wow there is a big hole in the mortar, I should probably wire-brush and vacuum that out.

By the time Matt poked his head back in, there was far more tiles removed than he originally thought needed to be.  I'm pretty sure he let out an audible gasp.  In all honesty, some of the tiles at the perimeter were still just being held in by friction, but he reminded me that re-tiling this bathroom is not even in the 3 year plan of projects.  I agreed to stop removing tiles and get to the mortaring.  The pattern was easy to match and the strange dent was filled in with the mortar.  I let it set a few days then applied some grout.  I used the "dirt" colored grout we used in the Pit, and it was a perfect match...to the grout that has been there for decades, probably started as white, and will not come clean.  The grout rehab is a project for another day.


Keyboard mount

I wanted to mount a second keyboard and mouse to the left of my drum set so that during recording, I don't have to reach all the way back over to the PC to start/stop/record a track. Unfortunately most wall mounted keyboard mounts were around $100. We decided to buy a cheap $15 monitor mount, and modify it to hold a piece of wood we measured to hold the keyboard and mouse.

The only thing left is a nicer midi keyboard with a stand to sit next to the computer keyboard/mouse. We may consider converting the closet to a "sound booth" eventually.
HVAC Fixaroo
For some reason, the previous home owner had been sending HVAC into the wall instead of into the room.  Classic move for efficiency.  We made a quick diverter with some sheet metal to send the air through the vent into the room instead of between the wall studs.  All the cracks and crevices were sealed with aluminum duct tape

Before, dumb

After, smart
We've been slacking on updating the blog, but not the projects.  We'll try to get better at this but sometimes life gets in the way of blogging about life.  My advisor Jonathan is in the process of moving his lab and his life to University of Georgia.  He'd been staying with us for 2 weeks and we were often beat.

Care of Matt, photo evidence of Halley and Jonathan passed out after a hard day of science and house projects


Tuesday, August 7, 2012

Of door locks, dead-bolts and wall repairs


Replaced Front Door Knob and Deadbolt
Before
If you've been to our house anytime before last week you have probably fought with the knob on our front door. It constantly felt stuck, and somehow loose at the same time. We finally got sick of it and decided to replace it.

We started by removing the existing one, which surprisingly wasnt as hard as 99% of the other "removal" processes we've encountered in this house so far. We did notice an odd rouge screw sitting inside the deadbolt's cavity. We shrugged our shoulders and removed it.

After removing all of the old hardware, we immediately noticed the new strike plate is larger, so we needed to chisel away a new "pocket" for it.
Chiseling away a pocket to fit the new strike plate


After we put everything in place, we wanted to rekey the lock to our existing keys. The locks we bought have a nice feature that lets you set the lock to any key that will fit in it. Halley started reading the instructions and charged ahead on this project. After a short bit we realized that we rekeyed the lock incorrectly so that no key would open the door.

We found some guides on how to "hack" these locks, but decided we'd rather be SURE we can lock the door at night so Halley headed back to Home Depot to get a new lock core.  The gentleman at the key desk gave us a new cylinder for free and re-keyed it to ensure it was done properly.


Replaced Garage Door Lock

Interior View
We're not quite sure how, but the knob that you turn to lock the bolts into the track of the garage broke and fell out one day.  This left our garage door open to the public for their pillaging pleasure (no one bothered our stuff, thank goodness).  We got a replacement mechanism at good ol' Home Depot, the install was uneventful.
Exterior View


Monitor Mount
The "lair"
Matt has quite a "lair" of a computer room.  While most people get by with a laptop screen, he find 4 monitors allow him maximum productivity for a wide array of projects.  I go along with this scheme because the monitors are almost all second hand, and they are powered down when not in use (which is often).  The fourth monitor now resides over the electronic drum kit, with additional keyboard and mouse to follow.  We've had the monitor mount for a while, but in the move we lost the bracket that mounts to the wall to hold the whole thing up.  After month's of searching, I found it in the yogurt container with the other wall hardware that was hastily removed as we left the apartment.  Now everything is in it's proper place.

Picture Frames
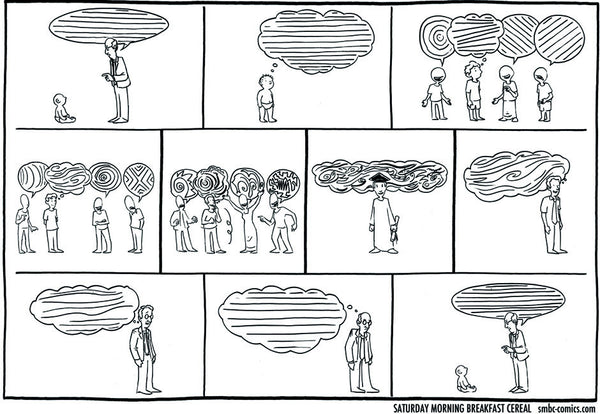
In the effort to put the finishing touches on the Pit, we've hung some of our wall art.  Featured pieces include the finger print tree from our wedding, two photos from my cousin Dave Soffa, a series of photos of the moon through the phases of an eclipse and two prints Matt ordered that he really loves.  One is a quote from a video game and the other is a comic about how the way we think changes as we age.


Car
The new whip
After 21 dutiful years on the road, Matt's Honda Civic puttered for the last time to Uncle Chris's shop.  The cost of repairs represented more than double the Kelly Blue Book value for the car, it was time to say goodbye.  We knew our next car would be a Honda, as we have seen them be fantastic in light of our terrible maintenance record.  Recently Matt commented that my check-engine light was on, I assured him that is was always that color.  After getting the car back from inspection with a few repairs, the light is now off.  I have no idea how long I was driving with it on.  Aaaanyway, back to the new car purchase.

Spreading fur all over the place on Day1
We tried to think of the "most flotsam to transport" scenario.  Our conclusion was going camping at Harper's Ferry with at most two car seats and at least one dog.  The CR-V was the logical conclusion, bigger than the Element, but not as enormous as the Pilot.  We love everything about it and are very grateful to our Uncle Chris for all his advice and help with the transaction.  


On our first trip to Home Depot after the purchase, we stood at a black Toyota Rav4 hitting the unlock button on the keys to no avail.  We've never had a big car like this before and are still getting used to it.  Although we knew Matt's car would bite the dust soon, the purchase will still slow some house projects.  C'est la vie, we love the car and can garden in the mean time.

Bonded Water Heater
One of the items on our "The home inspector told us to do it, so we are going to do it" list was to Bond the Water heater. After googling this a bit, Matt found that most people find this to be a bit overkill, but since it was only about 5$ in hardware we decided to do it anyway. The basic idea is that the cold water line is grounded naturally, but the hot could potentially build up a charge and discharge near a gas line or something scary. So all you need to do is slap some wire between the two. (He did follow the specifications online for gauge and placement, but in reality, it doesn't matter)


Water Heater Pilot
I shower in the morning and the water was just not getting hot, just barely above room temperature, which would explain why Matt didn't notice a problem.  Convinced the water heater was dying, and given the warning that it would need replacing in the home inspection, we started looking online for a new one.  In a stroke of genius, Matt went to check the pilot light, which should have been the first step.  The pilot light was out, causing the total lack of hot water.  Next time before we look to replace something, we should take a better look at the actual machine.

Pit Wall Repair
After the bump out of the wall in the Pit, we needed to do some repair work.  We cut away the layer of wallpaper and sanded the opening smooth.  After a few rounds of spackle, sanding and finally some paint, it doesn't look too shabby.  There is a texture difference, and even a color difference (despite the cans being mixed and purchased at the same time, with the same spec's) which is mostly hidden by the wedding fingerprint picture anyway.

Before
After